Properties
Records of small property and its active use by employees. Entries for the register can be made en masse and later supplemented by individual entries.
Agenda Property records
In the main bar of the application, click on the Property record button to process stock record records. This agenda is linked to a mobile application. Handing over tools to individual employees on the construction site takes place by scanning a barcode. By means of News (information messages), it is possible to send information to employees on their mobile applications about newly acquired machines or tools.
Adding a new record
- In the "Property/Property records" agenda, press the button
.
- On the "Basic information" tab, fill in:
- "Record type" - "Record" - if you want to create a folder, choose "Folder"
- "Active" - "Yes / No" - select "Yes" if you want to use the property immediately
- "Show employees" - "Yes / No" - determines whether the property should be visible to employees
- "Serial number" - optional data
- "Code" - the unique identifier of the property, according to which records are kept about it
- "Manufacturer" - optional
- Fill in the "Description" section of the form
- "Name" - title of the item (this information is mandatory)
- "Preview image"
- “Text description”
- Save the recording using the button
.
- In the "Currently" section of the form, fill in:
- "Photo" - current photo of the property
- "Currently responsible employee" - if not yet, leave blank
- "Currently on the project" - determines which project the asset is used on
- "Currently in stock" - determines which warehouse the property is assigned to
- In the "Show to groups" section of the form, fill in:
- "Groups" - "Add item" - allows you to assign assets only to a certain group of employees
- Finish by pressing the button
.
Bulk import of records
We recommend processing the first set of property item data in bulk - by importing from an XLS file.
- In the agenda "Property / Property records" on the list of records, press the button
.
- Download the sample XLSX template using the "Download XLSX template for import" link.
- Use the spreadsheet editor to add your property list to the file. Just follow the headings in the first row of the table. Columns marked with an asterisk must be filled in.
- Upload the completed file from your computer to the system using the "Select file" button.
- Finish by clicking on the button
.
Tip: We recommend sorting records into folders for clarity. For example, according to the type of tool.
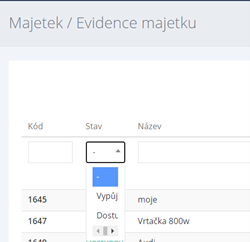
Agenda "Property / Asset records" allows you to filter the table, e.g. search an item of property (tool) by serial number. Graphical highlighting also quickly gives you information about the availability or rental status of tools.
Property usage history
In the Property form, on the History tab, information about the use of the property on the project is available. This tab is informative. Records are displayed here of transfers made to employees and projects.
Property lending
The "Rental" module is connected to the "Property" module. On the "Lend property" tab, you can see linked information and records.
Generating an overview of assets in XLS
Sharing data with other users and processors in XLS format is enabled by the "Generate XLS" function. The function exports the data that is contained in the grid.
The “Generate XLS” function reflects different settings for export:
- Export of all records in the overview
- Export of tagged records
- Export filtered records
Tip: You can limit export reports from Property in advance by selecting "Status". E.g. export all borrowed assets. Apply the filter in the "Status" field on the list of property items.
Agenda Documents
Agenda for registration and management of documents related to property registration. All documents that are generated from the application with a link to the property item will be displayed right here. It is convenient to sort the records into folders, for example according to the types of documents - warranty certificates, technical protocols, etc.
Adding a new folder
- In the "Property / Documents" agenda, press the button
.
- In the "Record type" field, select "Folder" from the drop-down menu.
- Fill in the name of the folder, e.g. Transfer Protocols.
- Finish by pressing the button
.
Adding a document to a folder
- In the "Property / Documents" agenda, focus on the folder in which you want to include the document.
- Press the “Add record to folder
” button.
- Fill in the "Name" field. This field is mandatory.
- Set the "Resolved" field according to the status of the record.
- Choose "Expiry date" by selecting from the calendar.
- You insert the recording attachment by clicking the "Drop files to upload" button and select the desired file.
- Continue by choosing in the "From user" or "For users (on the bulletin board)" fields.
- Select from the drop-down menu "For employees (creates a task for employees)" to assign the document to the employee's tasks.
- Do pole “Nový komentář” můžete zadat textovou poznámku a odeslat pomocí tlačítka
.
- Finish by pressing the button
.

 .
. .
. .
. .
. .
.

 ” button.
 .
.